
Cold-forming vs post-forming: how to specify laminate curves
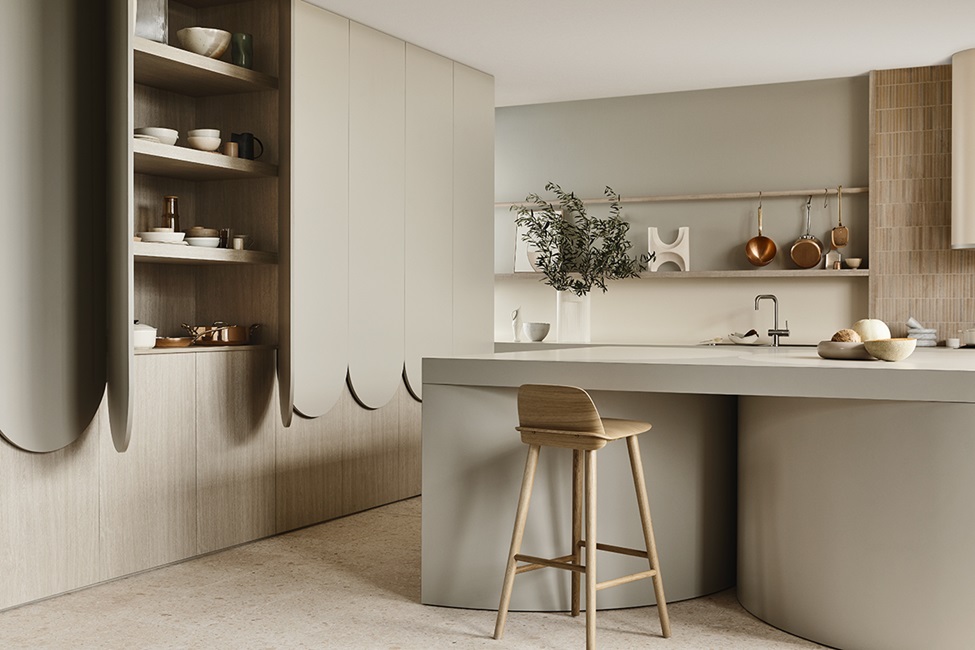
As part of their collaboration project with Laminex, respected architects Kennedy Nolan designed this kitchen to showcase the creative possibilities of Laminex® laminate. Here we explain how it can be used to make curved shapes and patterns.
Everyone’s familiar with laminate as a material for benchtops, typically in the form of high-pressure laminate (HPL), and for cabinetry, in the form of low-pressure melamine (LPM). But as we see in this design by Kennedy Nolan, they can be much more than just the flat, rectangular surfaces we’ve come to expect. They can be used to create beautiful curves, organic shapes and decorative patterns that will transform a utilitarian space like a kitchen into something special and memorable.
Understanding cold-forming
There are two fabrication methods for creating curved surfaces with laminate: cold-forming and post-forming. The majority of Laminex’s HPL range can be used this way, with each laminate’s thickness influencing the degree of curvature that can be achieved.
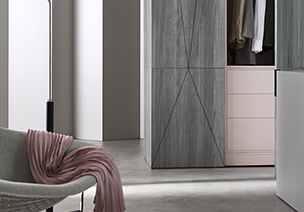
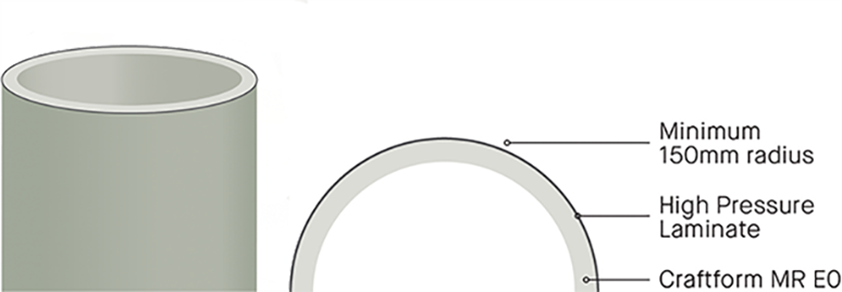
The curved surfaces in Kennedy Nolan’s kitchen – the drum-shaped legs in the base of the island bench, the cylindrical rangehoods, and the rear benchtop that flows up into the splashback – were cold-formed. In this process, a curved substrate, such as Trade Essentials Craftform, is fabricated to the desired shape and the HPL is simply adhered directly to the surface. This approach is most useful when designing relatively open-angled curves, with the smallest achievable radius being 150mm, with Laminex Redback HPL. In some cases, mechanical fastening may be required, to prevent the laminate from springing back into its original shape. The rangehoods in this kitchen, for example, were fastened at the point where the two edges of the laminate meet, which was positioned out of sight at the rear of the fitting.
Understanding post-forming

The other fabrication technique, post-forming, is used when much tighter curves are required, down to a minimum external radius of 5mm. In this process, the HPL is heated in a post-forming machine, which softens the resins in the laminate sheet and allows it to be bent and conformed to the shape of the substrate. This is how the edges of bullnose benchtops have been laminated for many years, but advances in Laminex resin technology have meant that these much tighter radiuses can now be achieved, opening up a new range of creative applications. And while there are no post-formed curves in this kitchen, there are in the next collaboration with Kennedy Nolan, which will be shared here soon.
Cold-forming and post-forming can only be used for linear curves – that is, the laminate can’t be twisted around more than one axis – and there are different techniques that will achieve different effects. The best way to understand how to bring a curved design to reality is to work with an experienced fabricator.
Making patterns and shapes
Laminate doesn’t only make curved surfaces, it can also make curved edges, as we see in the key decorative elements in Kennedy Nolan’s kitchen – the scalloped doors of the tower cabinetry, and the geometrical pattern in the island benchtop. These were produced using different techniques and different products.
The scalloped doors were made from LPM (also known as decorated board), as is typically the case with Laminex doors and panels. In this case, the panels were cut into the desired non-rectangular shape, and then edged with matching HPL. For a different finished result, Laminex ABS edging could also have been used.
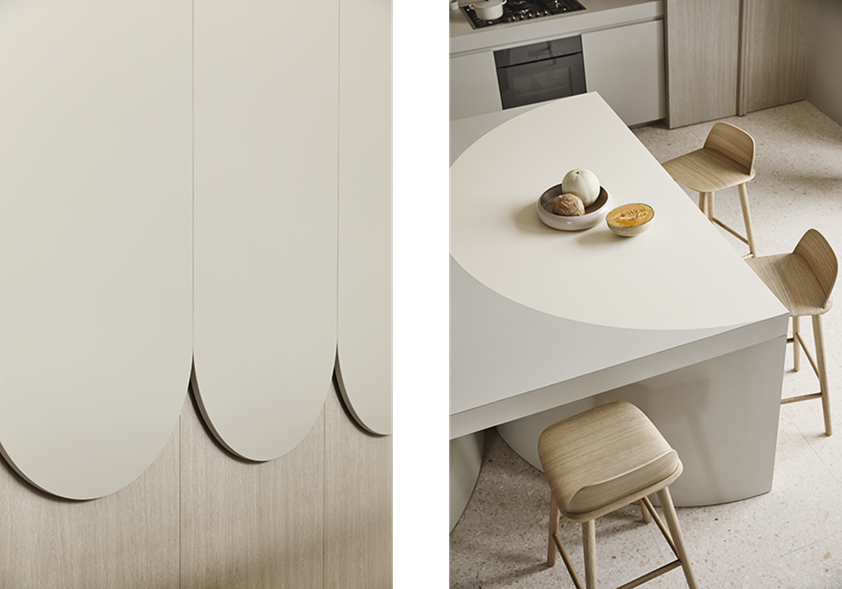
The island benchtop, however, was made with HPL, which is the recommended product for horizontal work surfaces. Two decors were used, with each precisely cut into their interlocking geometrical pattern and carefully adhered to the substrate to achieve a smooth join. This technique can be used to achieve all kinds of different patterns, but care has to be taken when creating shapes with tighter angles. It’s also recommended to use laminates in the same finish, as different finishes can have slightly different thicknesses, which would result in an uneven surface.
For specific advice, you should contact Laminex directly or speak with your cabinetry supplier.
Contributors
Architects: Kennedy Nolan
Photographer: Derek Swalwell
Stylist: Natalie James
Art Direction: Ortolan
Editorial Consultant: Infinite Shapes
Island benchtop fabrication: Evolve Interiors